Creating New Interactive Entities
This guide walks you through the process of creating and configuring Interactive Entities for the Gameplay Interaction Plugin. Create new actors for players to interact with easily.
There are two ways to create interactive entities in your game:
1. Inherit from AInteractiveEntity
You can create a new interactive entity by inheriting from the AInteractiveEntity actor that comes with the plugin.
- Create a new Blueprint or C++ class based on
AInteractiveEntity. - In your actor Blueprint, add meshes or visuals to design your entity.
- To enable outline drawing, override the following methods:
SupportsDrawingOutlineDrawOutlineRemoveOutline
Call SetRenderCustomDepth(true/false) on the meshes you want to highlight or remove highlight with outlines.
2. Use Your Own Actor + Interfaces (C++ Only)
If you'd like to convert your own actor into an interactive entity, implement the following interfaces in C++:
IOutlineDrawingEntityInterfaceIGameplayInteractiveEntityInterface
Here's a full example:
#include "GameplayTagContainer.h"
#include "IOutlineDrawingEntityInterface.h"
#include "Core/GameplayInteractionLibrary.h"
#include "Core/IGameplayInteractiveEntityInterface.h"
#include "Core/GameplayEntityInteractionComponent.h"

class UAbilitySystemComponent;
class UGameplayInteractionOptions;

UCLASS(Blueprintable, BlueprintType)
class GAMEPLAYINTERACTION_API AMyOwnActor : public AActor, public IOutlineDrawingEntityInterface, public IGameplayInteractiveEntityInterface
{
    GENERATED_BODY()

public:

    AMyOwnActor(const FObjectInitializer& ObjectInitializer);

    virtual void DrawOutline_Implementation() const override;
    virtual void RemoveOutline_Implementation() const override;
    virtual bool SupportsDrawingOutline_Implementation() const override;

    UFUNCTION(BlueprintPure, Category = "Entity")
    virtual UGameplayInteractionOptions* GetInteractionOptions() override;

    UFUNCTION(BlueprintPure, Category = "Entity")
    virtual UGameplayEntityInteractionComponent* GetInteractionComponent() override;

    UFUNCTION(BlueprintPure, Category = "Entity")
    virtual bool CanInteract(UAbilitySystemComponent* Player, FGameplayTagContainer& FailureTags) override;

    UFUNCTION(BlueprintPure, Category = "Entity")
    FGameplayInteractionOption GetInteractionOptionByIndex(int32 OptionIndex);

protected:

    UPROPERTY(EditDefaultsOnly, BlueprintReadOnly, Category = "Entity")
    TObjectPtr<UGameplayEntityInteractionComponent> InteractionComponent;
};
AMyOwnActor::AMyOwnActor(const FObjectInitializer& ObjectInitializer) : Super(ObjectInitializer)
{
    bReplicates = true;
    SetReplicatingMovement(true);
    bReplicateUsingRegisteredSubObjectList = true;

    InteractionComponent = CreateDefaultSubobject<UGameplayEntityInteractionComponent>(TEXT("InteractionComponent"));
    InteractionComponent->SetIsReplicated(true);
}

void AMyOwnActor::DrawOutline_Implementation() const
{
    // Define which meshes should display outlines.
}

void AMyOwnActor::RemoveOutline_Implementation() const
{
    // Remove outlines from the defined meshes.
}

bool AMyOwnActor::SupportsDrawingOutline_Implementation() const
{
    return true;
}

UGameplayInteractionOptions* AMyOwnActor::GetInteractionOptions()
{
    return InteractionComponent->GetInteractionOptions();
}

UGameplayEntityInteractionComponent* AMyOwnActor::GetInteractionComponent()
{
    return InteractionComponent;
}

bool AMyOwnActor::CanInteract(UAbilitySystemComponent* Player, FGameplayTagContainer& FailureTags)
{
    return InteractionComponent->CanInteract(Player, FailureTags);
}

FGameplayInteractionOption AMyOwnActor::GetInteractionOptionByIndex(const int32 OptionIndex)
{
    if (!InteractionComponent->GetInteractionOptions())
    {
        return FGameplayInteractionOption::EmptyOption;
    }

    const TArray<FGameplayInteractionOption>& Options = InteractionComponent->GetInteractionOptions()->GetOptions();

    if (Options.IsValidIndex(OptionIndex))
    {
        return Options[OptionIndex];
    }

    return FGameplayInteractionOption::EmptyOption;
}
3. Configure Your Interactive Entity
After adding meshes and visuals to your interactive actor:
- Select the
InteractionComponentin the Details panel. - Choose an Interaction Policy that matches the desired behavior (e.g., Default, Specific Number Of Players, Specific Players).
- Under the component settings, assign the interaction options that will be granted to the player when they approach or interact.
The table below outlines the available Interaction Policies you can assign to an interactive entity.
| Policy Name | Description | Notes |
|---|---|---|
Default | Unlimited interactions; any player can interact at any time without restrictions. | No special handling required. |
SpecificNumberOfPlayers | Allows a limited number of players to interact simultaneously, as specified in the component settings. | Players beyond the limit must wait until others finish interacting. |
SpecificPlayers | Only specific players can interact based on their UniqueNetId. | Use RegisterPlayerForInteraction and UnregisterPlayerFromInteraction on the server to control access. If removing an active interactor, call FinishInteraction. |
⚠️ Important:
RegisterPlayerForInteractionandUnregisterPlayerFromInteractionmust be called on the authority/server only.- If you unregister a player currently interacting, call
FinishInteractionto cleanly end their interaction state.
You can also create custom interaction policies by inheriting from the UGameplayInteractionPolicy C++ class.
This allows you to implement custom rules and behavior for interaction access, tailored to your game’s specific needs.
To create a new interaction options asset, refer to this page.
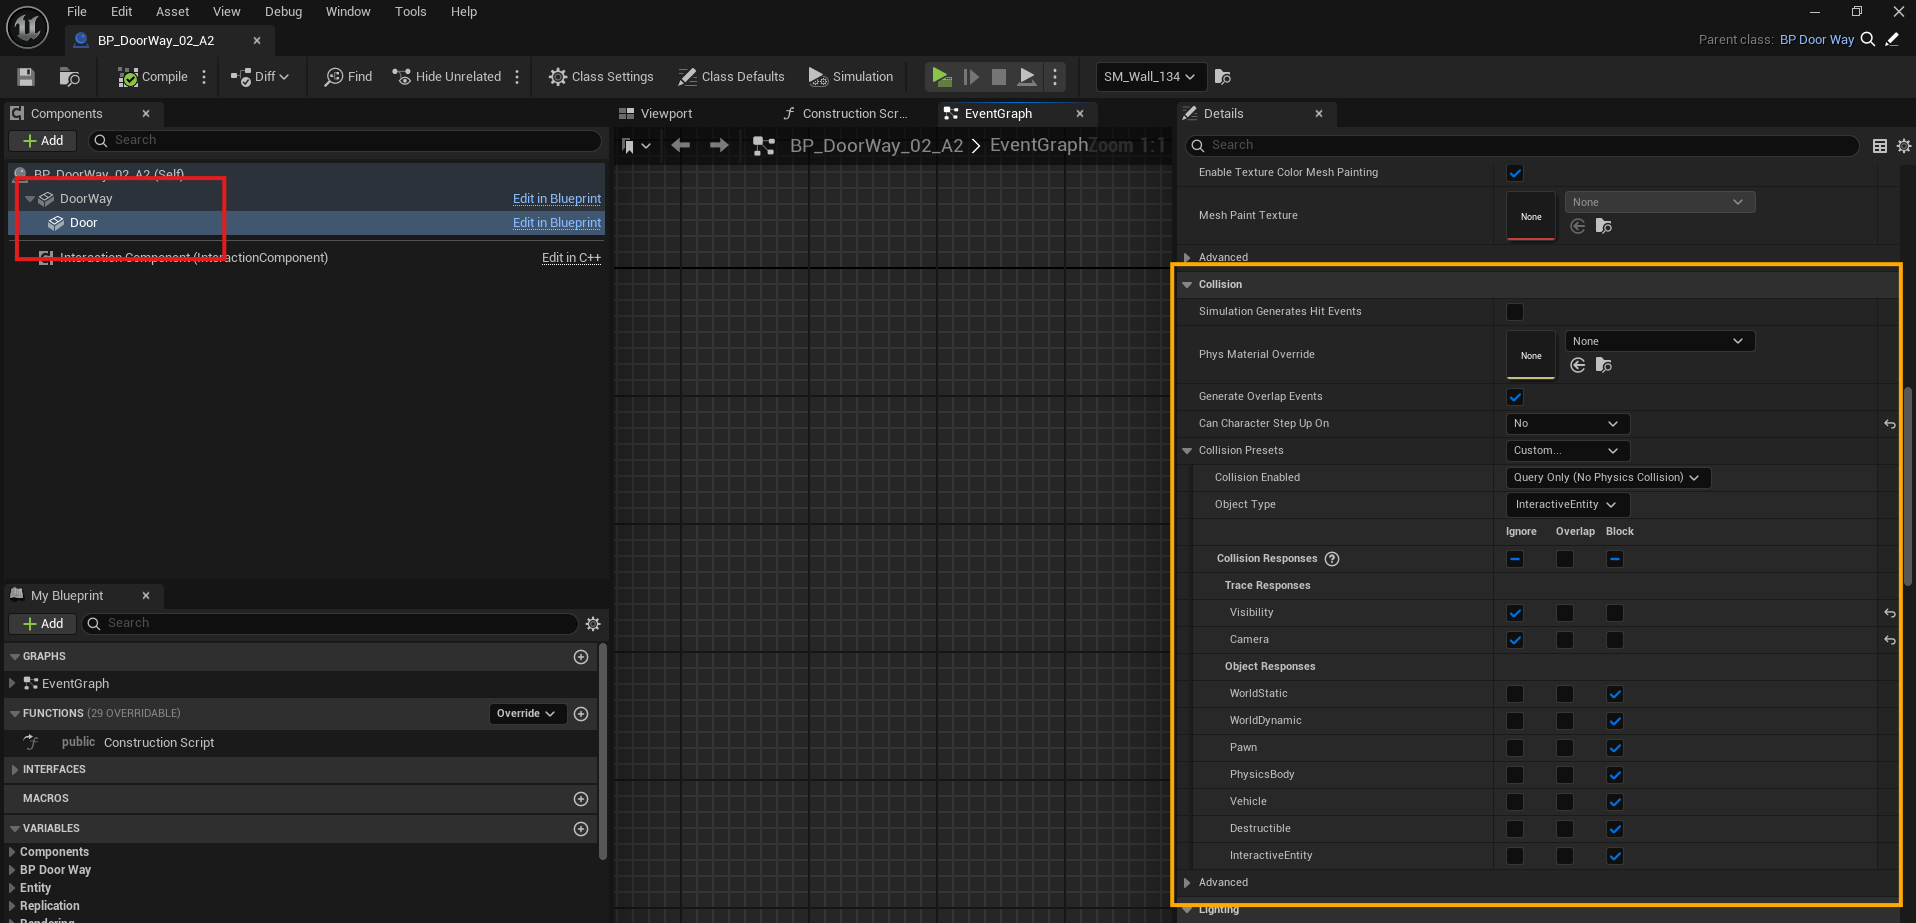
4. Configure Mesh Collision Settings for Interaction
Make sure the correct meshes are setup to handle player interaction:
- Select the mesh(es) you want the player to interact with (e.g., a door mesh).
- Set their collision preset to:
Interaction(recommended), orCustomand configure manually:- Set Object Type to
InteractiveEntity. - Ensure the InteractiveEntity collision response is set to Block.
- Disable collision for other unused channels, if needed.
- Set Object Type to
📌 This ensures the interaction trace system can detect the mesh when the player looks at it.
Refer to the image below for an example collision setup.

With either approach, you'll have full control over how your interactive entities look, behave, and react to player interaction.