Creating New Equipment Items
This guide explains how to create equipment items for your game using the Gameplay Containers. The steps include setting up equipment definitions, configuring meshes, animations, and abilities, and spawning equipment actors for your game. Follow along to set up functional and dynamic equipment.
1. Create a Gameplay Equipment Definition Data Asset
Start by creating a Gameplay Equipment Definition data asset. This serves as the core definition for the equipment.
Steps:
- In the Content Browser, right-click and select Miscellaneous > Data Asset > GameplayEquipmentDefinition.
- Name the asset (e.g.,
GED_MyItem). - Save the asset.
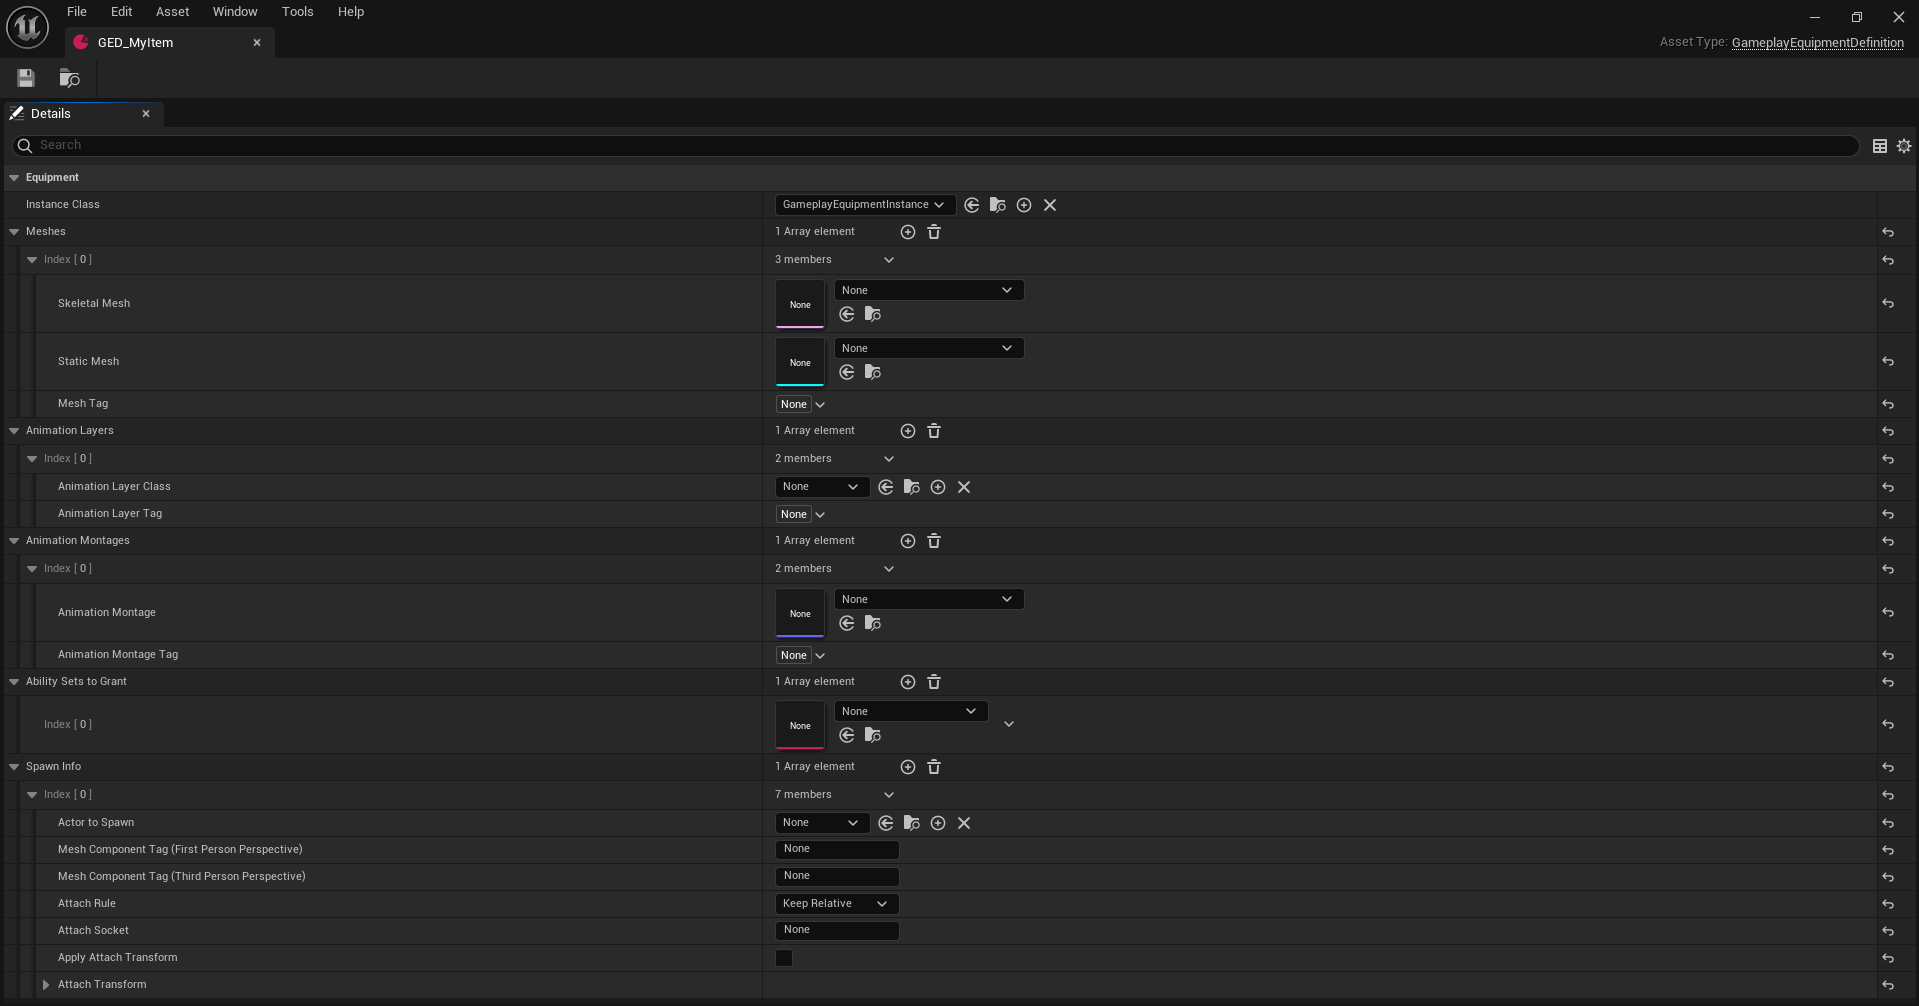
2. Set Up the Equipment Definition
Configure the equipment definition to specify what equipment instance should spawn when the item is equipped or active.
Steps:
- Open the equipment definition asset.
- Locate the Instance Class field and select the appropriate class that inherits from
GameplayEquipmentInstance. - Save your configuration.
3. Configure Modular Meshes
If your game uses modular meshes for equipment, define which meshes should be used. Each mesh is identified by a tag for later lookup.
Steps:
- In the equipment definition, locate the Meshes section.
- Add entries for the required modular meshes.
- Tag: Assign a unique identifier for each mesh.
- Mesh Reference: Link the skeletal or static mesh.
- Save the asset.
4. Configure Animation Layers
Define animation layers that should be linked when the equipment is equipped or unequipped. Animation layers are identified by tags for lookup.
Steps:
- In the equipment definition, find the Animation Layers section.
- Add entries for each required animation layer.
- Tag: Assign a unique tag for the layer.
- Layer Class: Specify the class of the animation layer to link.
- Save the configuration.
5. Configure Animation Montages
Set up animation montages to play during equipment transitions such as equipping, unequipping, or switching items. These are especially useful for hotbar systems.
Steps:
- In the equipment definition, navigate to the Animation Montages section.
- Add entries for each montage.
- Tag: Assign a unique tag for the montage.
- Montage Reference: Link the animation montage asset.
- Save the configuration.
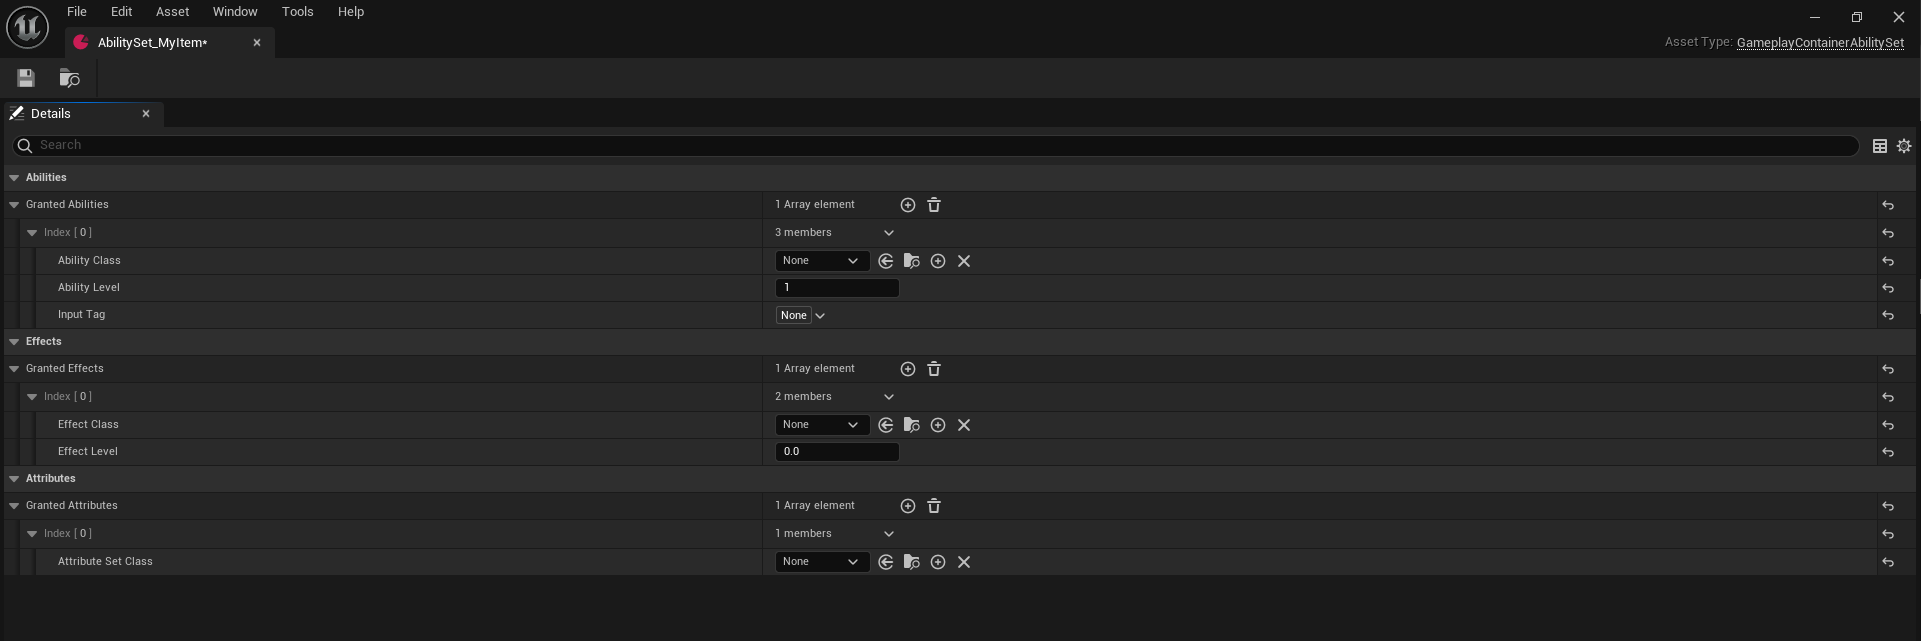
6. Configure Abilities, Effects, and Attributes
Create a GameplayContainerAbilitySet data asset to configure which gameplay abilities, effects, and attributes are granted to the player or object equipping the item. These are automatically removed upon unequipping.
Steps:
- In the Content Browser, right-click and select Miscellaneous > Data Asset > GameplayContainerAbilitySet.
- Name the asset (e.g.,
AbilitySet_MyItem). - Open the asset and configure:
- Abilities: Add gameplay ability classes.
- Effects: Add gameplay effect classes.
- Attributes: Add attribute sets.
- Save the asset.
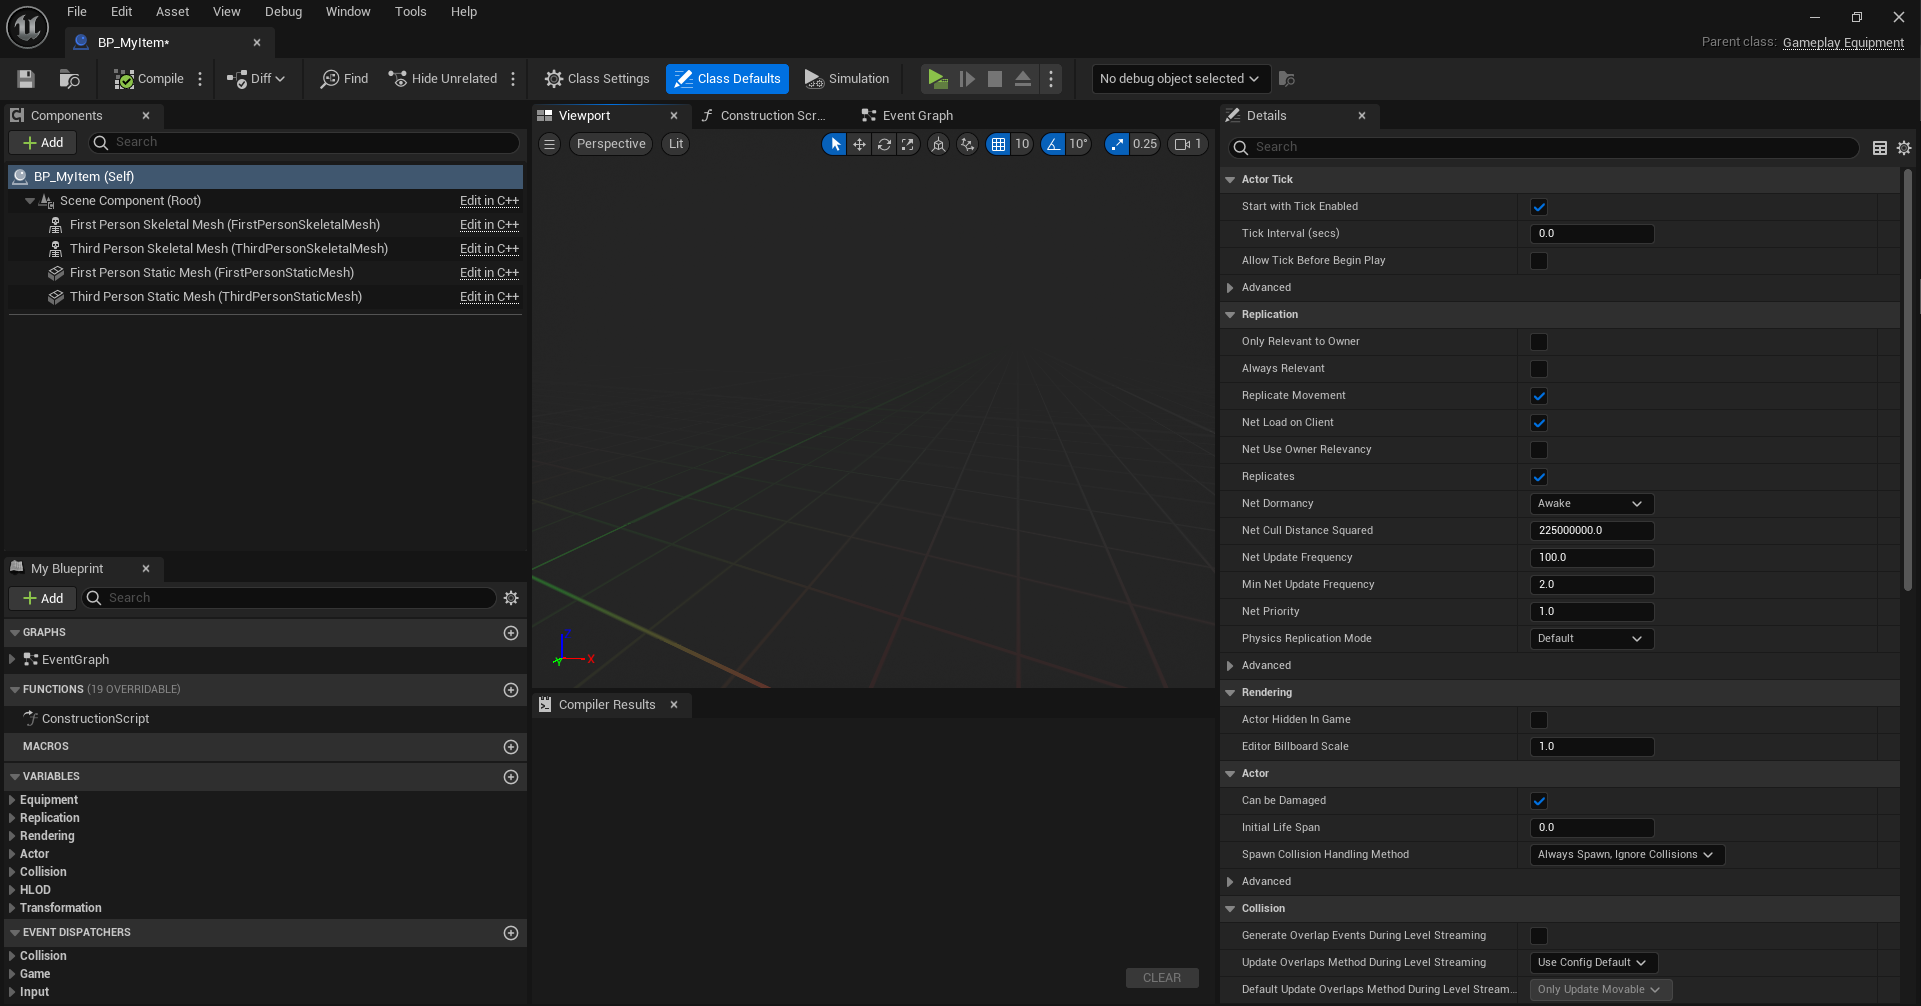
7. Create an Equipment Actor
Create an actor that inherits from GameplayEquipment. This represents the equipment in the game world, containing meshes to attach to the player when equipped and destroyed when unequipped.
Steps:
- Create a new actor class that inherits from
GameplayEquipment. - Add the required meshes to the actor as components.
- Configure the collision settings for the meshes.
- Save the actor.
8. Specify Equipment Spawning Info
Finally, configure how the equipment should spawn for the player, including actor details, attachment rules, and modular mesh information.
Steps:
- In the equipment definition asset, locate the Spawning Info section.
- Configure the following:
- Actor Class: Specify the equipment actor class to spawn.
- Attachment Rules: Set rules for attachment (e.g., socket name, transform).
- Meshes to Attach: Define which meshes to use, identified by tags matching the character's mesh component tags.
- Save the configuration.
Important for the equipment to work properly
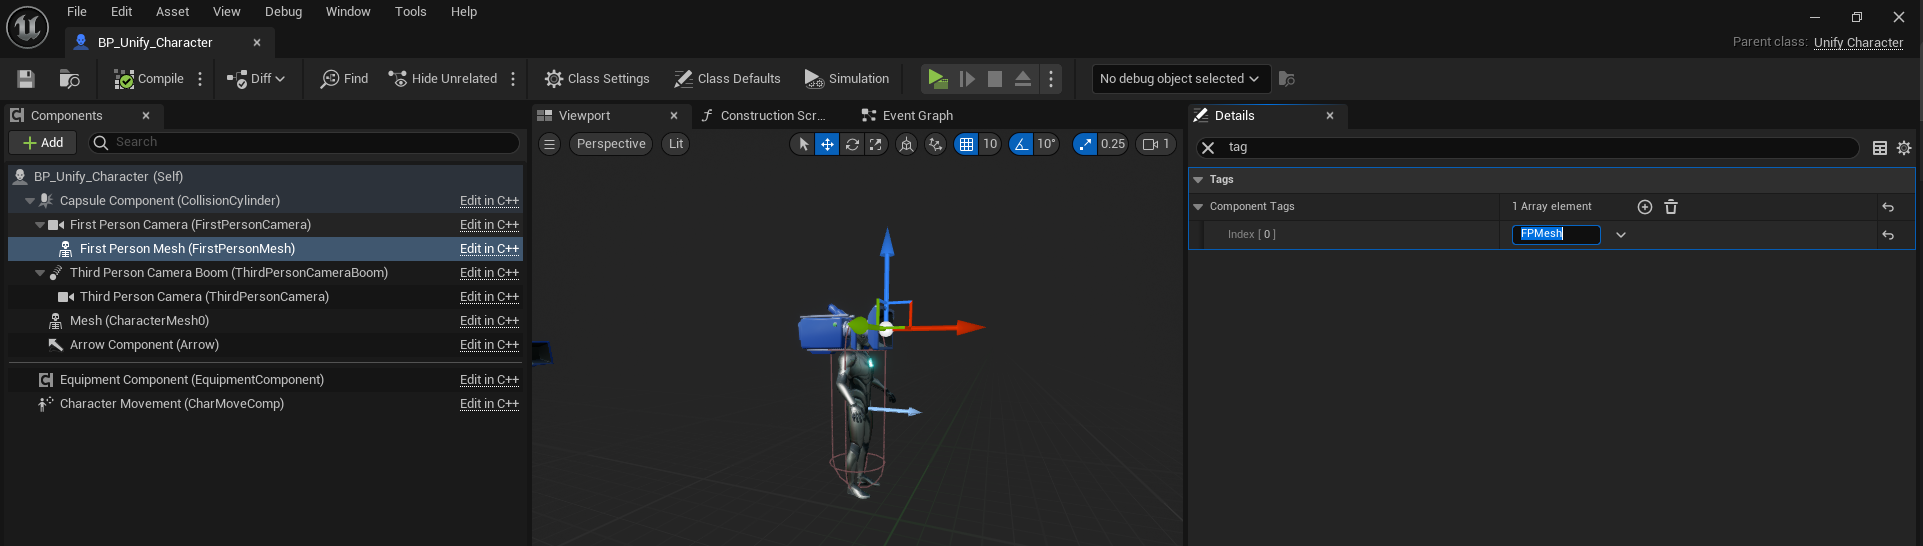
Configuring Equipment Attachment to Your Character/Pawn
To ensure that the plugin can find and attach equipment to the correct mesh in your character or pawn, follow these steps:
-
Select the Mesh to Attach Equipment:
- Open your character or pawn class.
- Identify the mesh you want to use for attaching equipment. Common examples include
FirstPersonMesh,ThirdPersonMesh, or any other custom mesh you wish to use.
-
Add a Component Tag:
- For the mesh you've chosen, add a component tag to it. This tag is used by the plugin to identify and attach the equipment correctly.
- Ensure that the tag you assign matches the tag defined in the equipment's configuration. This alignment ensures the plugin knows which mesh the equipment should be attached to.
-
Implement the
IGameplayEquipmentInterface:- In order to facilitate the process of finding and interacting with the mesh by tag, implement the
IGameplayEquipmentInterfacein your character or pawn class. This interface provides the necessary functionality to look up and use the mesh based on the assigned component tag.
- In order to facilitate the process of finding and interacting with the mesh by tag, implement the
-
Example Implementation:
- Refer to the image below for a visual representation of how the mesh and tag should be set up.
- You can find an example implementation in the code below, which demonstrates how to use the tag and interface for attaching equipment to the correct mesh.
UMeshComponent* AMyCharacter::GetMeshComponentByTag(const FName ComponentTag) const
{
	return Cast<UMeshComponent>(FindComponentByTag(UMeshComponent::StaticClass(), ComponentTag));
}

void AMyCharacter::OnItemEquipped(const UGameplayItemDefinition* Item)
{
	if (Item)
	{
		// You can also change equipment meshes here if you want to

		const TSubclassOf<UAnimInstance> AnimLayer_FirstPerson = Item->GetFragmentByClass<UGameplayItemFragment_Equipment>()->GetEquipmentDefinition()->GetAnimationLayerInfoByTag(GameplayContainerTags::TAG_Perspective_FirstPerson_Equipment_AnimationLayer_Equipped).AnimationLayerClass;
		const TSubclassOf<UAnimInstance> AnimLayer_ThirdPerson = Item->GetFragmentByClass<UGameplayItemFragment_Equipment>()->GetEquipmentDefinition()->GetAnimationLayerInfoByTag(GameplayContainerTags::TAG_Perspective_ThirdPerson_Equipment_AnimationLayer_Equipped).AnimationLayerClass;

		if (UAnimInstance* MyAnimInstance = FirstPersonMesh->GetAnimInstance())
		{
			MyAnimInstance->LinkAnimClassLayers(AnimLayer_FirstPerson);
		}

		if (const USkeletalMeshComponent* MyMesh = GetMesh())
		{
			if (UAnimInstance* MyAnimInstance = MyMesh->GetAnimInstance())
			{
				MyAnimInstance->LinkAnimClassLayers(AnimLayer_ThirdPerson);
			}
		}
	}
}

void AMyCharacter::OnItemUnequipped(const UGameplayItemDefinition* Item)
{
	if (Item)
	{
		// You can also change equipment meshes here if you want to

		const TSubclassOf<UAnimInstance> AnimLayer_FirstPerson = Item->GetFragmentByClass<UGameplayItemFragment_Equipment>()->GetEquipmentDefinition()->GetAnimationLayerInfoByTag(GameplayContainerTags::TAG_Perspective_FirstPerson_Equipment_AnimationLayer_Unequipped).AnimationLayerClass;
		const TSubclassOf<UAnimInstance> AnimLayer_ThirdPerson = Item->GetFragmentByClass<UGameplayItemFragment_Equipment>()->GetEquipmentDefinition()->GetAnimationLayerInfoByTag(GameplayContainerTags::TAG_Perspective_ThirdPerson_Equipment_AnimationLayer_Unequipped).AnimationLayerClass;

		if (UAnimInstance* MyAnimInstance = FirstPersonMesh->GetAnimInstance())
		{
			MyAnimInstance->LinkAnimClassLayers(AnimLayer_FirstPerson);
		}

		if (const USkeletalMeshComponent* MyMesh = GetMesh())
		{
			if (UAnimInstance* MyAnimInstance = MyMesh->GetAnimInstance())
			{
				MyAnimInstance->LinkAnimClassLayers(AnimLayer_ThirdPerson);
			}
		}
	}
}